Fly Tying Techniques: Essential Methods Every Fly Tier Should Master
Fly tying techniques are what separate average flies from durable, fish-catching patterns. Small adjustments in thread control, material handling, proportions, and finishing methods make a big difference on the water.
On this page, you’ll find practical techniques I use at my own bench — the kinds of details that improve consistency, durability, and efficiency. Some are foundational. Others are refinements that elevate your tying once the basics are second nature.
Study them. Practice them. Adapt them to your style.
Because in fly tying, mastery isn’t about knowing every technique — it’s about applying the right ones well.
New to fly tying?
If you're just getting started, this page dives into specific techniques.
But if you want the full roadmap — tools, materials, patterns, and step-by-step instruction — start here:
Start here: Core techniques
If you’re building your foundation, begin with these essential methods.
You can’t start a fly unless you know how to finish it — so the whip finish and other core techniques belong at the base of your tying skill set.
And don’t forget: keep that hook eye clean.
Whip Finish (Hand + Tool Method)
Learn how to properly secure your thread and finish clean every time.
Keeping the Hook Eye Clean
Simple habits that prevent frustration and save flies.
Thread Control
Thread control is the foundation of every durable fly.

Whether wrapping thread, ribbing, or body material, maintaining even pressure is essential for clean, durable flies.
Once you begin wrapping thread around the hook shank and secure the tag end, tension alone will hold materials in place. From that point forward, consistency becomes everything.
The most common mistake I see?
Inconsistent tension while rotating the bobbin 360 degrees around the hook.
If pressure changes mid-wrap, materials twist, shift, or loosen.
The fix is simple:
Maintain equal pressure on every rotation around the shank.
Practice this deliberately — and you’ll feel your flies become cleaner, tighter, and more durable almost immediately.

A smooth, even thread base gives your materials something to bite into and keeps them from spinning on the hook shank. Touching wraps, steady tension, and clean coverage create the foundation everything else depends on.
If the base is uneven, the fly will be too.
THREAD BASE
Every durable fly starts here.
Before materials go on, the hook needs something to grip. A smooth hook shank — especially modern chemically sharpened hooks — allows materials to spin or shift under tension.
A clean, even thread base creates structure from the very first wrap.
Why it matters
Prevents materials from spinning
Increases grip on slick hooks
Creates a smooth underbody
Improves overall durability
The Fix
Start your thread cleanly and anchor it firmly.
Wrap rearward with controlled, touching turns.
Keep the base thin and even.
The Common Mistake
Too few wraps — or uneven coverage that builds ridges and unnecessary bulk.
If your base isn’t smooth, everything layered on top will reflect it.
Practice this deliberately — and your flies will immediately tie straighter, cleaner, and stronger. Here’s a practical example of building a foundation that locks materials in place.
In this short clip, Allen Rupp demonstrates a simple way to create a textured foundation that prevents materials from spinning. A light scuff and controlled thread wraps can dramatically increase grip on slick hooks.
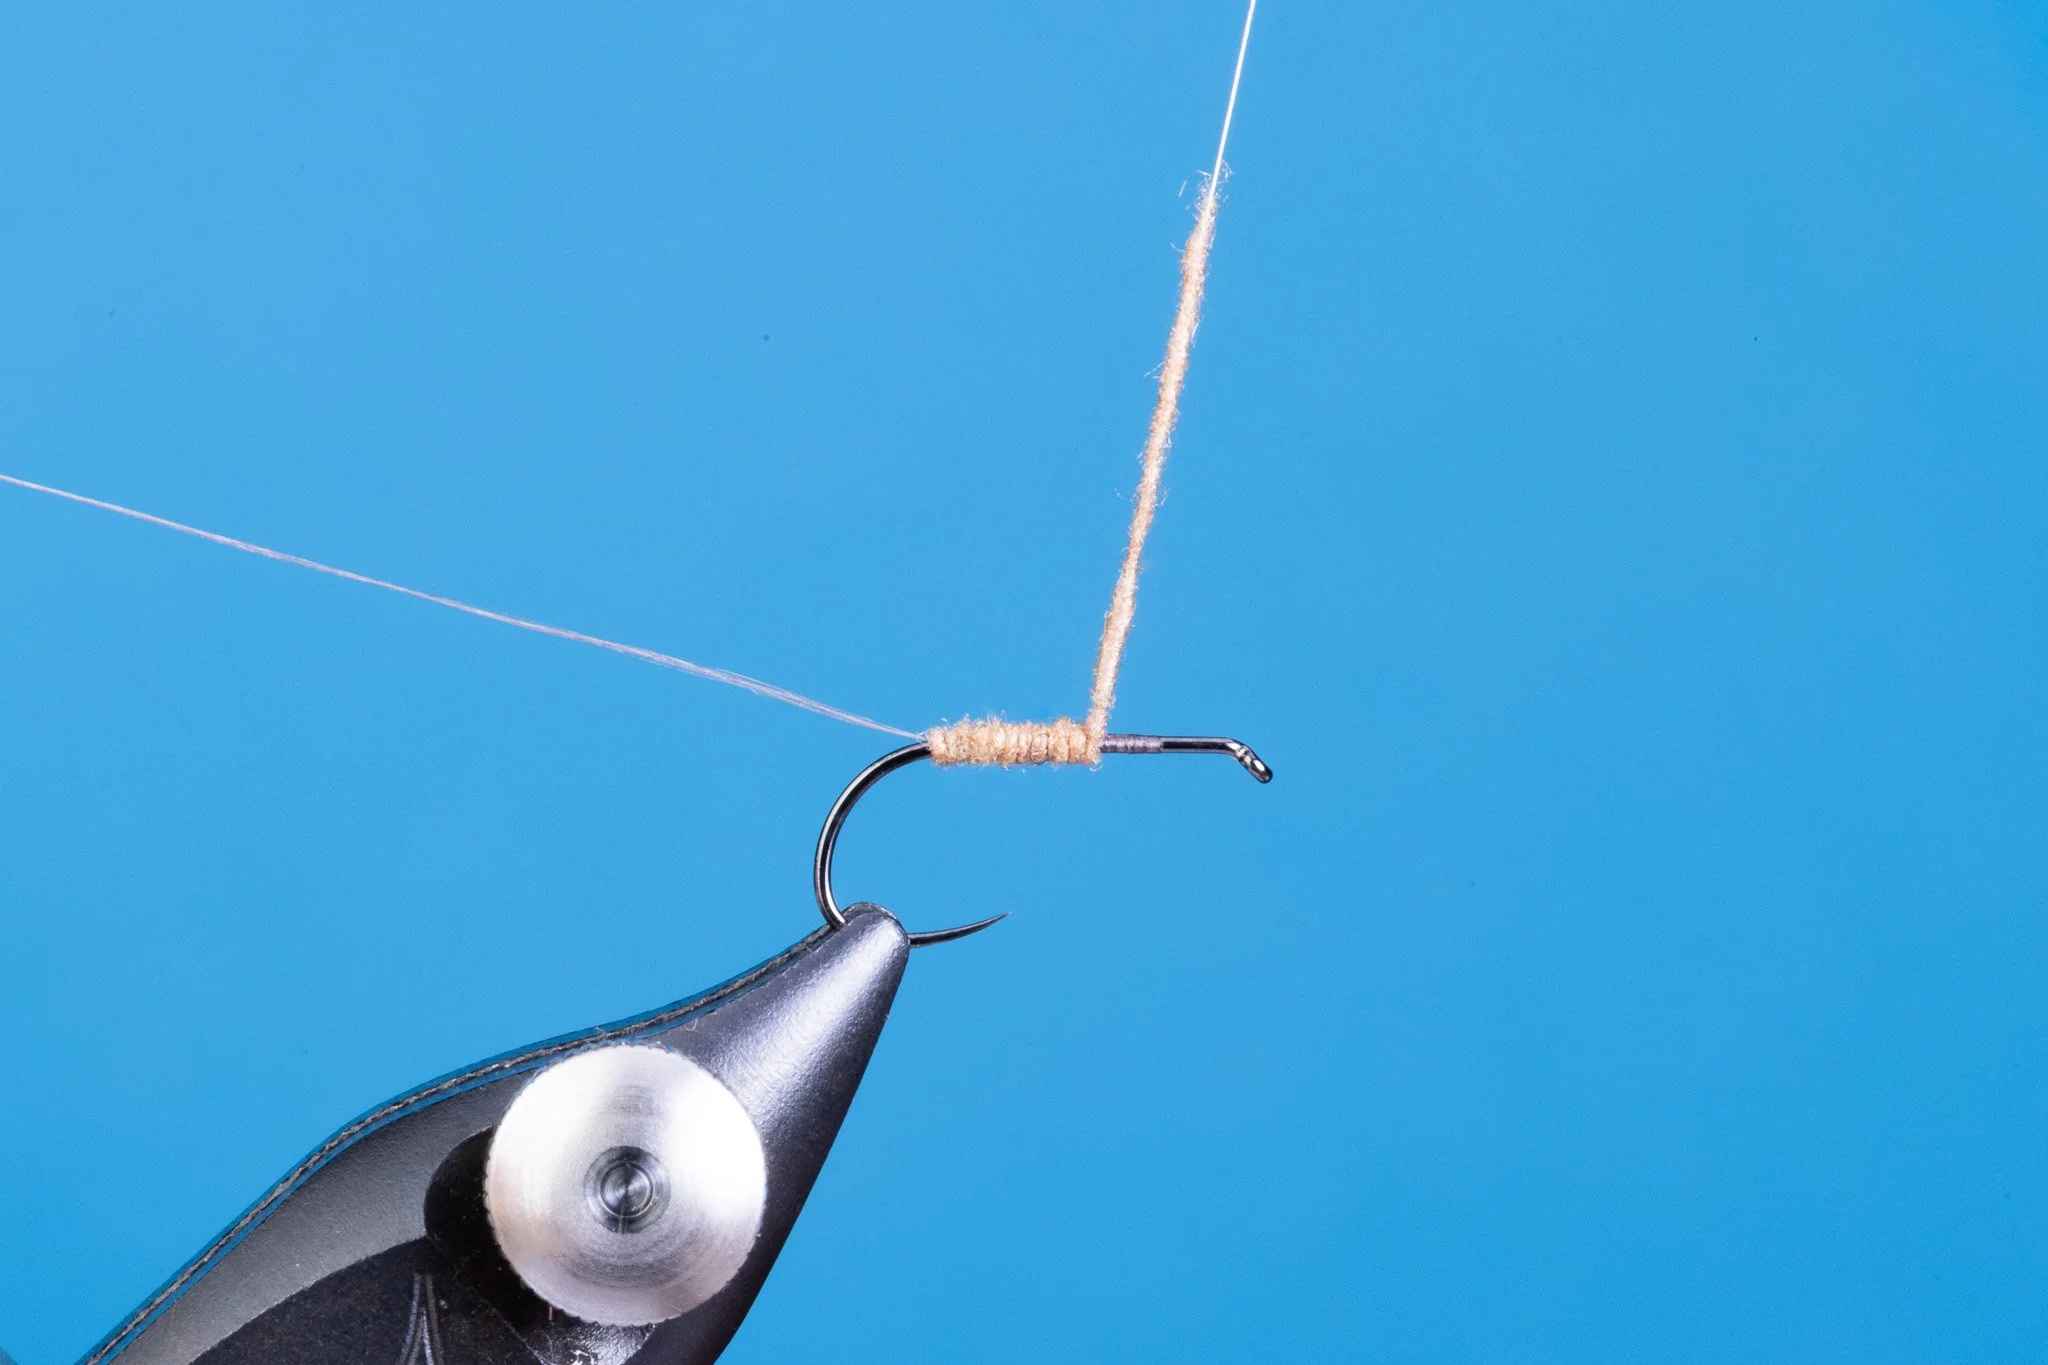
Pinch Wrap
The Control Technique That Changes Everything
Tim Flagler delivers one of the clearest demonstrations of the pinch wrap you’ll find. Watch how he pinches the material in place, applies controlled thread tension, and prevents fibers from spinning around the hook shank. It’s a simple adjustment — but one that gives you immediate control over placement, proportion, and durability.
If materials spin around the hook, it’s not the fly’s fault — it’s your wrap.
The pinch wrap is the difference between frustration and control.
When I first learned to tie, this single adjustment had the biggest payoff in my flies. Master this technique, and everything from tails to wings will sit exactly where you intend.
Steps to a pinch wrap:
Stop your thread at the tie-in point.
Measure and hold the material in place with your non-bobbin hand.
Bring the thread straight up, pinch material and thread together.
Continue the wrap, then pull straight down to lock everything in.
When You Use It
• Securing tails (pheasant tail fibers, Coq de León, marabou)
• Setting upright wings or posts (parachutes, comparaduns)
• Locking in slippery or stiff materials before tightening thread tension
What This Fixes
• Materials spinning around the hook shank
• Tails or wings drifting off-center
• Bulk building up from repeated correction wraps
A tight dubbing noodle creates a slim, controlled dry fly body that floats better and lasts longer.
Dubbing Basics: Build Better Bodies
Few things drive new tyers crazier than making a dubbing noodle.
But dubbed bodies are foundational — they show up everywhere, from dry flies to nymphs. Dubbing can be natural (hare’s ear, squirrel, muskrat) or synthetic, with all kinds of length, texture, and flash. In general, synthetics can be trickier to dub cleanly.
Here’s the tip I wish I learned years earlier: your thread matters almost as much as the dubbing. Slightly tacky or waxed threads grab fibers faster, help them “bite,” and keep material from slipping when you spin.
Next, I’ll break dubbing down step-by-step so you can consistently build smooth bodies and tight, durable noodles.
Step-by-step: How to make a clean dubbing noodle
Choose the right amount (start tiny).
Pull out a pinch that looks too small. You can always add more. Using too much is the #1 reason noodles get lumpy and bulky.Prep the dubbing before it touches the thread.
Tease it apart with your fingers. Align or “mix” fibers lightly so there aren’t hard clumps. For natural dubbing, remove any extra guard hairs if you want a smoother body.Set your thread foundation.
Lay a thin, even base where the body will go. A flat, controlled base helps the dubbing wrap evenly instead of stacking into ridges.Add tack (optional but helpful).
If your thread isn’t naturally a little tacky, add a light touch of wax. For slippery synthetics, a tiny bit of dubbing wax or tacky wax makes a huge difference.Lay dubbing on the thread, don’t mash it.
Place the fibers along the thread and let them spread out. You’re aiming for an even “veil” of dubbing, not a ball.Twist in the correct direction (tight first).
Twist the dubbing onto the thread into a rope. Start with a tighter noodle near the front of the thread (closest to the hook) so your first wraps are clean. Keep it tight enough that you can gently tug it and it doesn’t slide.Dubbing noodle diameter
I prefer to keep the noodle the same thickness throughout, then I can build the taper with increased wraps. This prevents a thick, sausage body. If you’d prefer a tapered noodle, make the front half of the noodle thinner and the back half slightly thicker.Wrap with touching turns and light pressure.
Wrap forward with controlled, slightly overlapping turns. Let the noodle do the work—if you pull too hard, you’ll thin it and expose thread.Re-dub as needed (don’t fight a short noodle).
When you run out, stop. Make another small noodle and continue. Two clean noodles always beat one long messy one.Finish the body cleanly.
Use bare thread for the last 1–2 turns at the front if you need a clean tie-in point for the thorax, wingcase, hackle, or whip finish.
Quick fixes (when it goes wrong)
It’s lumpy: you used too much dubbing or didn’t prep it—use less and tease it out more.
It won’t stick: thread is too slick—add a touch of wax or use a slightly tacky/waxed thread.
Body is too bulky: make a thinner noodle and wrap with lighter pressure.
Dubbing falls off while wrapping: twist tighter and keep the fibers closer to the thread (shorter fibers dub easier).
Synthetics are driving you crazy: blend a pinch of natural dubbing in, or use a dubbing loop for long/slippery fibers.
Tom Baltz makes dubbing look easy! Start at the 11:53 mark and watch a master at work.
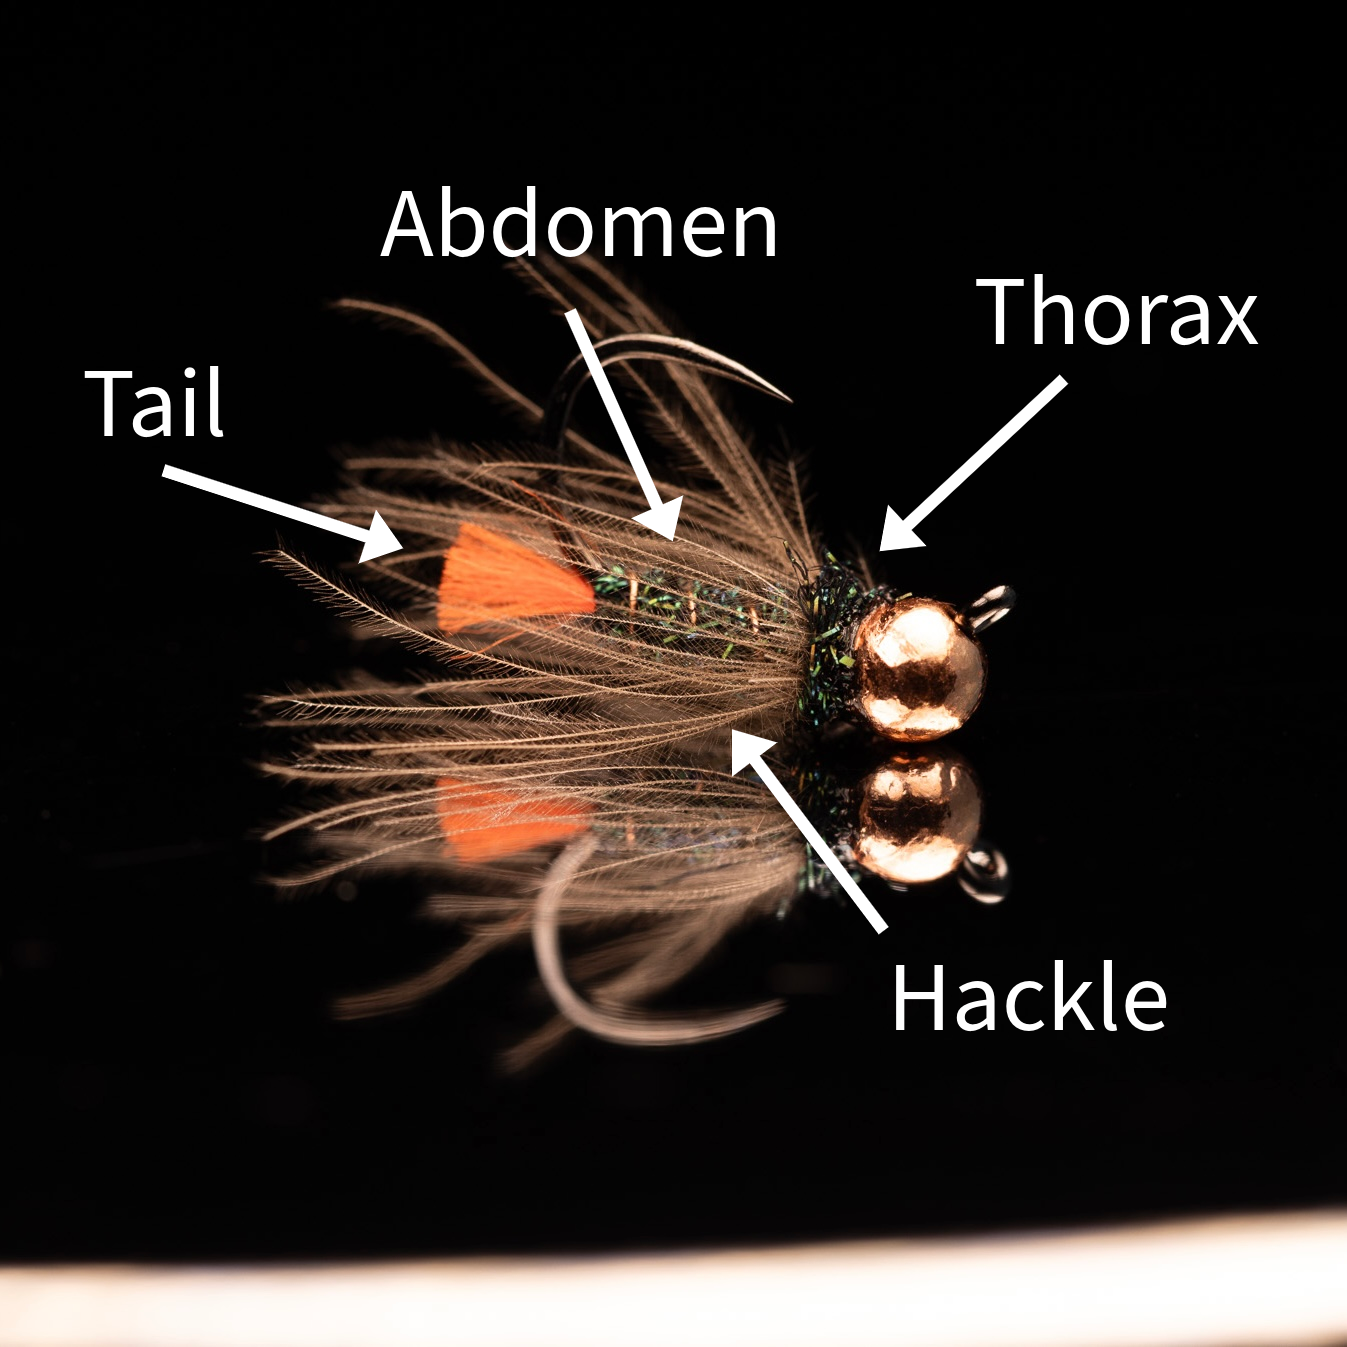
Labeled anatomy of a Blowtorch Nymph showing the key material placement zones: tail, abdomen, thorax, and hackle. Understanding where materials belong is the foundation of proper fly proportions.
Material Placement
Proper proportions start with putting materials in the right place on the hook.
Most fly tying material lists tell you what to use for a pattern, but rarely explain where those materials belong. Understanding this layout makes it much easier to tie balanced flies.
While the exact structure varies by pattern, most flies are built around the same core sections:
Tail
Materials tied at the rear of the fly that extend beyond the hook bend. Tails help imitate insect tails or add movement. Most tails are locked in place along the shank right before the hook starts to bend.
Abdomen
The main body section of the fly, running along the hook shank. This is usually the longest portion and often represents the slender body of an insect.
Thorax
The thicker front section of the body just behind the hook eye. This area often holds legs, wings, or heavier materials.
Wings
Materials tied above the hook that imitate insect wings or create a visible silhouette on the water.
Legs / Hackle
Materials that imitate insect legs or add movement. Hackle can also help dry flies float.
Dry fly Wings, hackle, and Posts
Placement and location are key to building an imitative dry fly.
Dry flies rely on wings, hackle, and posts to imitate insects that sit on the surface film. These materials help create the correct silhouette while also supporting the fly so it rides properly on the water.
While patterns vary, most dry flies use one or more of these key elements:
Wings
Materials tied above the hook to imitate the upright or folded wings of an adult insect. Wings help define the fly’s profile and can also make the fly easier for anglers to see on the water. Example patterns include an Elk Hair Caddis and Stimulator.
Hackle
Feathers wrapped around the hook to imitate insect legs while also helping the fly float. The stiffness and density of the hackle determine how high the fly rides on the surface. Catskill-style patterns use hackle tied around the hook shank, classics like the Quill Gordon and Royal Wulff.
Posts
An upright material used primarily in parachute-style flies. The hackle is wrapped around the post, which helps the fly land correctly and improves visibility for the angler. The most popular dry fly tied in this style is the Parachute Adams.